Wednesday, July 4, 2012

TA DA

Well it only took a month but the damage from our water incident is finally repaired.


Now Pam and I are not novices at remodeling or building from scratch for that matter.  Having survived building a house from scratch mostly by our selves.  However there is one thing that I truly hate and that is an unplanned remodel.  I like to go in knowing what I am going to do and where I am going to get the parts and pieces.  It makes me crazy.  That however is what we were faced with here.

After some very quick research we settled on an Aquatic Bubble Tub.  The old tub was Cultured Marble (a fancy way to resin with marble dust mixed in).  The new tub acrylic.  The old was supposed to be a Jacuzzi however it only had four poorly placed jets and was impossible to stretch out in.  The new is a Bubble Tub (forced air only no water jets) and even I can stretch my legs out fully when sitting.  The old tub had a cultured marble front skirt that was supposed to be removable.  Since it broke into several pieces when we tried to move it I would say it was not removable.  The new tub has a hardwood skirt.  We initially were going to finish it the same as the cabinets but decided that would be too much dark wood in the bathroom and that finishing it like the walls would be better.
Here are few pics of the tub going together.


My one splurge on this project was that I hired a plumber to take the tub out and put the new one in. It put me a little over my budget but I just was not in the mood to break up the old tub and deal with the builders rough in boo boos.  Luckily I found a good and reasonable plumber through a friend.  The plumber that I had used for years had retired and left the business.  Had the same experience recently with AC people as well.  So far we have been lucky in finding replacements.

You will not we decided to go with tile rather than the cultured marble that had been used around the tub.  The tile matches the shower that I remodeled in Feb.  Since it was an open stock item and still in stock that made that decision easy.  You will also notice the bathtub is now freestanding and will not be connected to the cabinets.  The front panels can be removed for access to plumbing and air blower. Behind the tub is now Hardy board.  The whole tub can be pulled out without damaging the tile.  All of the holes the builder had left in the concrete have been filled and the tub is properly bedded in a light weight concrete.

One of the reasons it took us a month to finish is that the tub and the cabinets as well as the tub faucets had to be ordered.  The cabinets were locally built and are all wood.  The fronts solid maple and the sides and back are cabinet grade plywood wrapped in vinyl.  The cabinets have been installed in such a way that they can be removed if necessary and each vanity is actually two pieces.  The drawer unit is one and the door unit the second.  The are also now a standard 48".  This reconfiguration meant though that the six month old granite counter tops we had just installed would not work.  The builder had used customs of a definitely non standard size.  And sine they had bee glued to the tub (and the wall and the floor they did not come out in one piece.  The installer had also in his infinite wisdom installed the screws at an angle and in such a way that they could not be removed with the counter top on.  So the old cabinets (which were custom but built of MDF except for the fronts) hit the trash in small pieces.  You could say I took my frustrations out on them.  OK, so I beat the @#*# out of them on purpose.

Here are the new cabinets.  And of course my supervisor checking them out


I used a good grade of cabinet plywood for the underlayment for the new granite.  The plywood was installed using mounting brackets from below so the whole counter top can be removed in one piece with five screws.  Pam decided to go with a granite that was lighter than before and with more tans in it.  It was installed on Tuesday July 3rd. 

Here are the cabinets with the new granite and the sinks reinstalled.


I did plumb the sinks myself and took the opportunity to clean up the builders sloppy work on the drains.  Other than some very minor touch up work to the baseboards and the master closet door this project is now done.

Here is a picture of the inside of Pam's tub.  She is quite pleased with the changes.  So now I have my new shower and she has her new tub.  Now hopefully no more big projects until the fall when it is cooler again.


Hope your world is turning smoothly;

Bruce and Pam


Friday, June 1, 2012

The Best Laid Plans

It has only been a few months since I completed a remodel on our master bath.  New paint, new granite counter tops and new sinks.  A spiffy new shower as well as new curtains and accessories.  So I thought we were good for awhile right.  Wrong!  We returned from a trip to San Antonio to find the plumbing in the master bath had sprung a leak and we had a flooded closet and master bath.  So out came the carpet and pad in the closet and in went the fans and desiccant.  The leak was in the wall behind my vanity so we had to tear that out to get to it.  Sheet rock was wet and molding so it and the cabinet went.  The builder had put the cabinet in such a way that we had to break part of the tub to get it out.  As well as the sheet rock behind the tub was wet so out came the tub (in pieces).  Now we are left to build our newly remodeled bathroom back again.  And so the title of this piece.


This where the tub used to be.  Yes that is the hole we found the builder left under the tub.  Usually they are much smaller and most will fill with lightweight cement after the drain is fitted.  We also found a very weird plumbing and electrical setup for the Jacuzzi tub.


This is where my vanity was.  It couldn't be saved it was water logged and turing green.

The offending plumbing.  Second pipe on the manifold from the left.  You can see my patch until the plumbers arrived.


Plumbing repaired.  Cost $260.  Cost to repair all the damage about $7500.


Master Closet.  Dried pretty quickly but we had to scrape all the grunge off the floors left by the painters to get the smell out.

We had just discussed taking a break from any more projects until the fall.  Oh well.

Hope you are high. dry and happy.

Pam and Bruce

Thursday, March 29, 2012

This Place is Going to the Birds

Yes I know it's "Going to the Dogs"  However this last week we have been working on the backyard and many of the projects are for the birds.  While we like birds the real driving force is our cats.  The birds give them something to watch during the day from their indoor perches.

Here is the Purple Martin house I put up.  Don't let the claim on the box fool you.  They are not easy to assemble, though it is an ingenious design executed in all plastic so no rot to worry about.  I mounted it on a home engineered PVC mount so it also will not become a lightning rod.


Three of the 12 houses are now occupied.  I am pretty sure by Purple Martins.  I say pretty sure as the Martin is a member of the swallow family and I have only seen females the male is the one with the deep purple coloration.

Some of the other things we have in the backyard are for us as they draw humming birds and butterflies.  Perhaps my love of butterflies goes back to my father's father a world renowned entomologist.  Any way here are some pictures.  Not quite the Dallas Arboretum but nice this time of year


We added some new trees to the backyard as well.  Some Italian Cypress and a Spartan Juniper.  These should grow to twenty to 30 feet tall pretty quickly.


Spring is in full swing here and I am worried that we will have a hot and brutal summer.  The good news is for the first time in many years the local lakes are all full thanks to some pretty significant rain in February and March.


More Later

Bruce and Pam

Friday, March 16, 2012

A Change of Venue

Last Saturday ,Pam and I left for San Antonio on a mission.  Our project was to finish out a backyard Studio for her sister Linda.  Linda had the studio built (OK its a Tuff Shed) about 18 months ago and was having trouble finding some on to finish it for her.  So around the first of the year I told her I would come down and finish it out.  We arrived on Saturday at about 2:00.  by about 5:30 the building was wired.  Now an electrician is going to come and make the connection between the building and her existing electrical panel.  On Sunday we insulated and I cut a hole for the AC.  On Monday we put up wall panels.  We found a luan 1/4" panel that was perfect.  On Monday afternoon we installed the floor.  The floor was tongue and grove oak.  It had been left over from another project at our house in Murphy.  We then assembled some shelving for storage of materials and did a quick work around so she could have lights and AC until the Electrician got his part done.

As usual I took no before pictures and Pam took the afters.  They are a little blurry around the edges but will give you some idea. of the room now.  We returned to Dallas on Wednesday and have now moved to our back yard.


Storage was added at each end of the building in the form of 2ft platforms.  There is a third light in the middle and slightly higher so there is a good distribution of light.  We used daylight bulbs so the colors she is working with should run true.


Her drawing table


Storage shelves


We didn't get a picture of the floor.

To keep cost down we got creative with the trim.  The main trim is oak flooring and the window trim is the same as the paneling.  You can see the work around for the electricity.  Sine there are lines in the their back yard I was not comfortable with digging or laying electrical.  They need to call it in and have the lines marked and then hand dig the trench.  Digging is not one of my favorite things.

Anyway one more project down.  Many more to go.

Bruce and Pam

Friday, March 9, 2012

Oh My Aching Back

Spring seems to be synonymous with projects around this house.  With the Master Bathroom finished it was time to move on. So last week I put in a new garden border.  Castle Blocks of course, 100 were used.


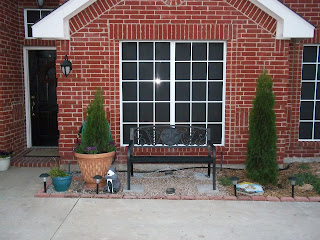
Of course that meant new mulch and removal and addition of plants.  So that made the garden on the other side look bad so we redid it and added a bench and replaced our tired old legustrum trees outside our entry.


Which will eventually lead to a new front door and a new paint scheme but that is later this spring.

I also tore down 75 feet of fence between us and one of our neighbors and we built it back.  Nice new cedar fence.  That leaves me one more section.


Pam is checking out my work.  Normally Smokey is my supervisor but he doesn't go outside so Pam is picking up the slack.


We also set up a bench in the back yard. There have been new plantings in the back as well but it is far from finished..

A local golf course was cutting trees and I couldn't resist hauling back a chunk of tree that I am going to care a concave in and we are going to use as a bird feeder.


More on this project later.

Smokey and Blaze had a visitor last week as well and smokey could not resist trying out Sophie's crate.  We kept him in a crate at night when he was a kitten and I think he was having a flashback.


He has adopted a new perch in the last few weeks.


He only does this when Pam is sitting at her computer. This is actually an improvement as prior to this he would try to correct her spelling.

More projects are on tap and hopefully I survive the spring.

Hope all is well in your world.

Bruce and Pam


Wednesday, February 22, 2012

Don't You Just Love It When A Plan Comes Together!

Well the bathroom is finally done.  Even the curtains and the accessories.  Well maybe there are still a few accessories but isn't there always.  We went with earth tones this time. I was able to find curtains we could agree on at Target and they were on clearance they just were not the right size.  No real problem.  I own sharp tools and I know how to sew.  So I remodeled them into what we needed.  Even made a matching shower curtain.

Now I had not intended to cover the door to the shower.  However after Pam did an initial test run she pronounced it too open and suggested a shower for a door.  I am nothing if not cognizant that this was not an idle comment so I designed and made up a shower curtain for the door.  I still achieved my goal of no glass to clean.  It is much easier to throw a shower curtain in the wash every once in a while than deal with all the chemicals needed to keep glass clean.

The new exhaust fans are working well and every thing came together well.  Even had enough material left over to make the cats new beds for the windows.  Of course this had the unexpected effect of now having to finish remodeling some new curtains for the guest room.  Oh well.


Here is the new curtains (and Cat Beds).  You can see the bath mats are similar to the curtains.  Another Target find.


New shower all stocked


Floor is done and drains as designed (Thank God)


Shower entry before Shower Curtain


Toilet Room Curtains


New High Efficiency Koehler Toilet.  If you haven't tried a chair height toilet you need to look into them. Makes a huge difference on old knees.  Never would have thought 2 inches in height would make much difference but it does.  Wouldn't consider ever putting in a regular height toilet again.


Shower Curtain is now in.  Made from a matching curtain and I remodeled a fabric shower curtain liner to fit inside.  A bit like sewing a snake but it turned out well.  I also had to get creative to find a tie back that worked.  The one you see is actually a toilet paper holder but it works and it matches the rest of the hardware.

So this adventure is done. Now I will be working outside for a while.

I will leave you with a picture of my crazy cat.  He can fit in places that our other cat can't.  What you don't see is Smokey leaving the room in disgust when he could not get to blaze under the bookshelf.  Blaze also like to play this game under the ottoman.


More Later

Bruce and Pam

Saturday, February 11, 2012

The Progress Continues

I have continued to make headway on the shower project.  The new shower floor is in and has been coated with waterproofing.


The walls have been re-textured and the trim installed.  Everything has received several coats of new paint.  We did change the bathroom color from Antique Heritage Lace to Courtyard Tan.  New color is not as yellow.  Even the ceiling was repainted as I have installed new quieter and more powerful vent fans in the main bath and in the toilet room.  New toilet has also been installed as after we started this project we noticed the old one had cracked.  When I took the old toilet out I discovered it was because the old toilet flange had warped.

So I cut the old flange out and found it had not been correctly installed.  So a trip to Lowes and some work with a chisel and that problem was rectified.  Now is when the interesting part started.  We needed to replace the toilet so Pam and I went off to Lowes.  Now I have always used Kohler toilets when I need to replace and have never had a problem.  However, there was a Jaccuzzi brand with smooth sides that seemed like a good idea and it was 100 dollars less than the Kohler.  So we take one home.  I start unpacking it and find out what is in the box does not match what was on display and it is damaged to boot.  So that one goes back.  It seems they don't have the toilet on display but they have an American Standard that is similar.  So I purchase this one which the 100 dollar savings is now gone as it is actually more than the Kohler I usually buy but it will be easier to clean.  It also weighs a ton.  I go home with it and unpack it and notice it has a factory defect.  So back we go to Lowes again.  Now at this point my patience is wearing thin and so is Pam's so we buy the Kohler.  Long story short no problems it installs like a dream.  Moral of the story is sometimes it is best to stick with a product you know.

But back to the remodel.  Tile floors and grout get cleaned and new hardware is put up all around. Including new light switches (the rocker type) and outlets.  Granite countertops get sealed and caulking is removed and replaced throughout the whole bathroom.


Here you can see the sheet rock is all patched and painted.  Yes I do take that many supplements.


New more powerful Vent Fan


Shower floor has been tiled.

Next step is to put in the lower border tile, finish around the drain then comes the grout and final hardware trim out and this project will be finito.  Its about time.  Then I can start working outside.  Oh Boy!

More Later

Bruce and Pam